Installing 11.1 Enterprise Manager Grid Control October 23, 2010
Posted by tamnau in General.Tags: emctl, Enterprise Manager, General, Grid Control, oma, omr, oms, opmnctl, sysman, web logic, wls
4 comments
Grid Control 11g interface may have the same look and feel as the Grid Control 10g, but under the hood it is quite different. In version 10g, the OMS was a J2EE (OC4J) application deployed on the Oracle Application Server. Whereas in version 11g, the OMS is deployed on Web Logic Server (WLS) .
For this post, I have provided some simple steps on how to install the Grid Control with minimal pain.
The table below lists the configuration that will be used for the following demonstration.
| Product Software | Version | Host | Environment Settings |
| GC Repository Home | 11.2.0.1 | mama.earth.com | ORACLE_HOME=/u01/app/oracle/product/11.2.0/db_1 |
| GC Repository SID | 11.2.0.1 | mama.earth.com | ORACLE_SID=GCREP |
| JDK | 1.6 Update 18 | oem.earth.com | JDK_HOME=/u01/jdk16 |
| Middleware Home | 11.1.0.1 | oem.earth.com | MW_HOME=/u01/app/oracle/Middleware |
| Webtier | 11.1.1.2 | oem.earth.com | WT_HOME=/u01/app/oracle/Middleware/Oracle_WT |
| Web Logic Server (WLS) Home | 10.3.2.0 | oem.earth.com | WL_HOME=/u01/app/oracle/Middleware/wlserver_10.3 |
| WLS Instance Base | 10.3.2.0 | oem.earth.com | WLS_INSTANCE_BASE=/u01/app/oracle/gc_inst |
| WLS Instance Home | 10.3.2.0 | oem.earth.com | ORACLE_INSTANCE=/u01/app/oracle/gc_inst/WebTierIH1 |
| WLS Domain (GCDomain) | 10.3.2.0 | oem.earth.com | WLS_DOMAIN=/u01/app/oracle/gc_inst/user_projects/domains/GCDomain |
| OMS | 11.1.0.1 | oem.earth.com | ORACLE_HOME=/u01/app/oracle/Middleware/oms11g |
| Agent | 11.1.0.1 | oem.earth.com | ORACLE_HOME=/u01/app/oracle/Middleware/agent11g |
* SYSMAN is actually the application schema created in the GC. This is also the super administrator for logging into the EM Console.
SECTION 1 –PRE- INSTALLION TASKS
1. Verify the OS platform and supported Database version for the Grid Control Repository that is intended to be installed is supported. See My Oracle Support Note 412431.1 for further details.
2. Install the Database software and create a Database for the Grid Control Repository. A good example can be found here:
http://blog.ronnyegner-consulting.de/2009/09/14/oracle-11g-release-install-guide-install-single-database
NOTE: When creating the database do not configure Enterprise Manager during this step.
3. As per Grid Control installation manual, make sure the pre-requisites are met as mentioned at:
http://download.oracle.com/docs/cd/E11857_01/install.111/e15838/install_em_exist_db.htm#CIAIEAAC
NOTE: For this exercise, the repository was created on mama.earth.com and service name is GCREP
SECTION 2 – INSTALL JDK SOFTWARE
4. Download JDK 1.6 (6.0) from http://java.sun.com/products/archive/
NOTE: According to My Oracle Support Note 1063762.1 make sure that the JDK version 1.6 Update 18 is used for installation of WebLogic on Linux 64-bit (x86_64) platform.
5. Create the base directory for JDK and copy the file jdk-6u18-<os_platform>.bin to the new directory.
oracle@oem[]$ mkdir -p /u01/jdk16
oracle@oem[]$ cp –rp jdk-6u18-linux-x64.bin /u01/jdk16
6. Run the JDK installation
oracle@oem[]$ cd /u01/jdk16
oracle@oem[]$ ./jdk-6u18-linux-x64.bin
7. Reivew the License Agreement and then click on <SPACE BAR> to continue until the following prompt is reached:
Do you agree to the above license terms? [yes or no]
8. Type yes to continue
yes
9. Click on <ENTER> to continue
Press Enter to continue.....
10. This should now complete the installation for JDK.
Done.
11. Verify that the new JDK directory jdk1.6.0_18 has been created.
oracle@oem[]$ ls
jdk1.6.0_18
SECTION 3 – WEBLOGIC INSTALLATION
1. Download WebLogic Server software from http://www.oracle.com/technology/software/products/ias/htdocs/wls_main.html
NOTE: For this example, the installation will be performed on linux 64-bit platform, hence the Generic file version will be downloaded. If running windows (32bit – x86) or Sun (64bit – SPARC) then please download the alternative as listed below.
2. Set Local Display and then run via an X session to host:
oracle@oem[]$ xhost +
oracle@oem[]$ ssh <weblogic_host>
oracle@oem[]$ export DISPLAY=<LOCAL_DISPLAY>:<DISPLAY_NO>
Example:
oracle@oem[]$ xhost +
oracle@oem[]$ ssh oem.earth.com
oracle@oem[]$ export DISPLAY=laptop:0
3. Set JAVA Home to where the JDK installation path and then run the WebLogic Installer
oracle@oem[]$ export JAVA_HOME=/u01/jdk16/jdk1.6.0_18
oracle@oem[]$ $JAVA_HOME/bin/java -d64 -jar wls1032_generic.jar
4. The WebLogic Installer screen now appears, to continue click on Next.
5. Enter a new Middleware Home Directory (eg. /u01/app/oracle/Middleware) and then click on Next.
6. Register for Security Updates, leave default and click on Next.
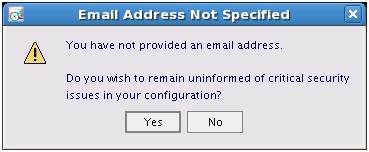
7. To continue click on Yes, if you wish to ignore setup for notification of security updates.
8. To skip configuration and continue to ignore setup for notification of security updates click on Yes.
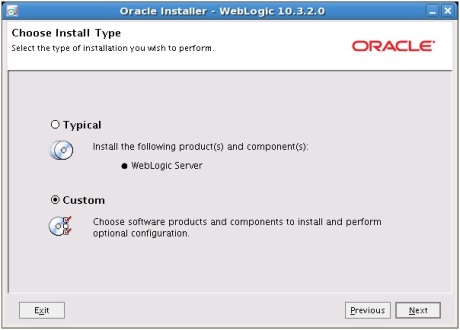
9. Select Typical for the installation type to perform and then click on Next.
10. Leave default options selected for Products and Components and then click on Next.
11. Verfy the JDK installed has been detected by the Oracle Installer for WebLogic and then click on Next.
12. Verify the default Product Home for WebLogic Server (eg. /u01/app/oracle/Middleware/wlserver_10.3) and the click on Next.
13. Review the Installation Summary and click on Next.
14. Installation is now in progress …. Please wait
15. Installation is now complete, deselect the option Run Quickstart and then click on Done.
SECTION 4 – WEBLOGIC WDJ7 PATCH INSTALLATION (USING SMART UPDATE)
It is strongly recommended that the Weblogic patch WDJ7 patch is applied before installing the Grid Control 11g software.
1. Set the JAVA_HOME:
oracle@oem[]$ export JAVA_HOME=/u01/jdk16/jdk1.6.0_18
2. Change directory to the BSU utility directory:
oracle@oem[]$ cd /u01/app/oracle/Middleware/utils/bsu
oracle@oem[]$ ./bsu.sh
3. Enter My Oracle Support* User Credentials.
NOTE: * Requires a valid support profile registered with http://support.oracle.com
4. Please wait as eSupport validates the user credentials.
5. This will refresh the library of patches available for download.
6. Complete registration for security updates or you may ignore and click on Continue.
7. To continue click on Yes, if you wish to ignore setup for notification of security updates
8. To skip configuration and continue to ignore setup for notification of security updates click on Yes.
9. The Smart Update Screen should now appear. Go to the Get Patches tab and select the WDJ7 patch and then click on Download Selected.
NOTE: Highlight Patches from the top menu and then select on Refresh View to get the latest listing of patches available for download.
10. Say Yes, to check for conflict of each patch and then click on Ok.
11. Please wait for validation to be completed and then click on Ok.
12. The WDJ7 patch has now downloaded.
13. Click on the Manage Patches, Then click on the button for WDJ7 patch located under the Apply column.
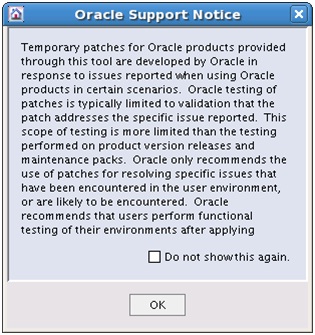
14. Review Oracle Support notice information regarding patches, and then click on Ok to continue.
15. Please wait for validation to be completed and then click on Ok.
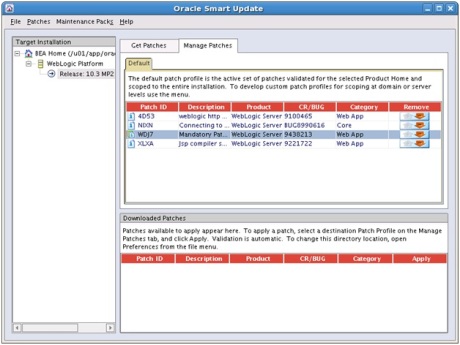
16. The patch should now appear in the top window of the Manage Patches tab. This verifies that the patch WDJ7 has been applied successfully.
17. This completes the patch update and the Smart Update program for WebLogic can be closed. Click on File and then on Exit.
SECTION 5 – Install Grid Control Software
1. Downloaded the software for 11gR1 Grid Control from:
http://www.oracle.com/technetwork/oem/grid-control/downloads/index.html
(NOTE: Under the Full Installers (Agent,Repository, OMS and Management Packs) section, download for the appropriate files for your platform. In this demonstration the Linux 64 bit version will be the example used.)
2. Extract all files in the same directory where the files were downloaded to:
oracle@oem[]$ unzip GridControl_11.1.0.1.0_Linux_x86-64_1of3.zip
oracle@oem[]$ unzip GridControl_11.1.0.1.0_Linux_x86-64_2of3.zip
oracle@oem[]$ unzip GridControl_11.1.0.1.0_Linux_x86-64_3of3.zip
3. Set Local Display and then run via an X session to host:
oracle@oem[]$ xhost +
oracle@oem[]$ ssh <weblogic_host>
oracle@oem[]$ export DISPLAY=<LOCAL_DISPLAY>:<DISPLAY_NO>
Example:
oracle@oem[]$ xhost +
oracle@oem[]$ ssh oem.earth.com
oracle@oem[]$ export DISPLAY=laptop:0
4. In the same directory where files were extracted to, execute the runInstaller to launch the Grid Control Installation Wizard:
Option 1
Run with no variable set:
oracle@oem[]$ cd install
oracle@oem[]$ ./runInstaller
Option 2
If the server has multiple hostname or alias of where the Grid Control installation is to be installed to, the ORACLE_HOSTNAME can be used to forced the Grid Control to use the preferred name
oracle@oem[]$ ./runInstaller ORACLE_HOSTNAME=<PREFERRED_NAME>
For example:
oracle@oem[]$ ./runInstaller ORACLE_HOSTNAME=oem.earth.com
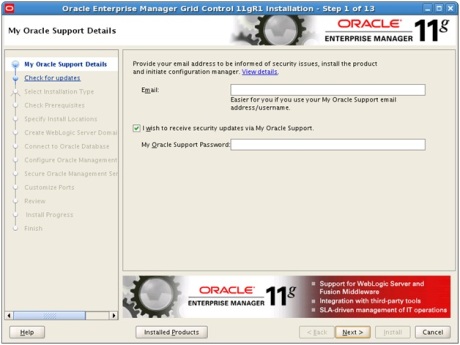
5. The Grid Control Installer screen now appears.
6. Register for Security Updates or leave default and click on Next.
7. To continue click on Yes, if you wish to ignore setup for notification of security updates

8. Leave default to Skip Software Updates and click on Next.
9. The default option of Install a new Enterprise Manager system is selected. Click on Next to continue.
10. Prerequisite checks will be performed.
11. Any failures or warning will be reported. Resolve issues according and click on Next.
12. Enter Passwords for the Weblogic Domain Administrator (weblogic) and Node Manager (nodemanager) and then click on Next.
13. Enter the database connection details for where the Grid Control Repository will be deployed to.
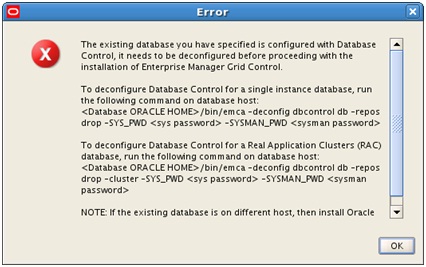
If the following error message below is reported, the installation has detected existing metadata objects in the Database for DB control. Otherwise continue on to the next step.
NOTE: The DB control (standalone Enterprise Manager) may have been installed when the database was created)
To deinstall DB control repository, run the following in a new terminal session on the database host of where the Grid Control Repository will reside:
oracle@mama[]$ export ORACLE_SID=GCREP; . oraenv
ORACLE_SID = [GCREP] ?
oracle@mama[GCREP]$ emca -deconfig dbcontrol db -repos drop -SYS_PWD oracle -SYSMAN_PWD oracle
STARTED EMCA at Aug 25, 2010 7:55:09 PM
EM Configuration Assistant, Version 11.2.0.0.2 Production
Copyright (c) 2003, 2005, Oracle.  All rights reserved.
Enter the following information:
Database SID: GCREP
Listener port number: 1521
Do you wish to continue? [yes(Y)/no(N)]: yes
Aug 25, 2010 7:55:27 PM oracle.sysman.emcp.EMConfig perform
INFO: This operation is being logged at /u01/app/oracle/cfgtoollogs/emca/GCREP/emca_2010_08_25_19_55_08.log.
Aug 25, 2010 7:55:27 PM oracle.sysman.emcp.EMDBPreConfig performDeconfiguration
WARNING: EM is not configured for this database. No EM-specific actions can be performed.
Aug 25, 2010 7:55:27 PM oracle.sysman.emcp.ParamsManager checkListenerStatusForDBControl
WARNING: Error initializing SQL connection. SQL operations cannot be performed
Aug 25, 2010 7:55:27 PM oracle.sysman.emcp.EMReposConfig invoke
INFO: Dropping the EM repository (this may take a while) ...
Aug 25, 2010 7:58:04 PM oracle.sysman.emcp.EMReposConfig invoke
INFO: Repository successfully dropped
Enterprise Manager configuration completed successfully
FINISHED EMCA at Aug 25, 2010 7:58:05 PM
Then return to the Grid Control Installation wizard to continue.
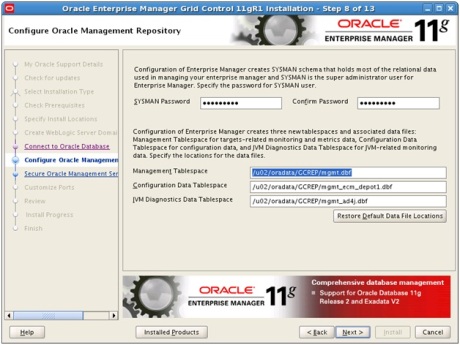
14. Set the sysman password and verify that the location of where the tablespaces will be created and then click on Next.
15. Set the registration password for securing communications in Grid Control. Uncheck the option for “Allow only secure access to the console” and then click on Next.
NOTE: This is the password that will be used to secure and register agents with the OMS.
16. Reconfigure ports as required, otherwise leave default and click on Next.
NOTE: Make sure that ports are accessible across the network. Enable firewall policies if required.
17. Review the Grid Control installation summary and then click on Install.
18. Installation is now in progress, please wait …
19. The root configuration scripts needs to be executed as recommended before proceeding.
In a new terminal session, as the super equivalent user (eg. root) execute the allroot.sh script.
root@oem[]# /u01/app/oracle/Middleware/oms11g/allroot.sh
Starting to execute allroot.sh .........
Starting to execute /u01/app/oracle/Middleware/oms11g/root.sh ......
Running Oracle 11g root.sh script...
The following environment variables are set as:
ORACLE_OWNER= oracle
ORACLE_HOME=  /u01/app/oracle/Middleware/oms11g
Enter the full pathname of the local bin directory: [/usr/local/bin]:
The file "dbhome" already exists in /usr/local/bin.  Overwrite it? (y/n)
[n]: y
Copying dbhome to /usr/local/bin ...
The file "oraenv" already exists in /usr/local/bin.  Overwrite it? (y/n)
[n]: y
Copying oraenv to /usr/local/bin ...
The file "coraenv" already exists in /usr/local/bin.  Overwrite it? (y/n)
[n]: y
Copying coraenv to /usr/local/bin ...
Entries will be added to the /etc/oratab file as needed by
Database Configuration Assistant when a database is created
Finished running generic part of root.sh script.
Now product-specific root actions will be performed.
Adding entry to /etc/oratab file...
Finished execution of  /u01/app/oracle/Middleware/oms11g/root.sh ......
Starting to execute /u01/app/oracle/Middleware/agent11g/root.sh ......
Running Oracle 11g root.sh script...
The following environment variables are set as:
ORACLE_OWNER= oracle
ORACLE_HOME=  /u01/app/oracle/Middleware/agent11g
Enter the full pathname of the local bin directory: [/usr/local/bin]:
The file "dbhome" already exists in /usr/local/bin.  Overwrite it? (y/n)
[n]: y
Copying dbhome to /usr/local/bin ...
The file "oraenv" already exists in /usr/local/bin.  Overwrite it? (y/n)
[n]: y
Copying oraenv to /usr/local/bin ...
The file "coraenv" already exists in /usr/local/bin.  Overwrite it? (y/n)
[n]: y
Copying coraenv to /usr/local/bin ...
Entries will be added to the /etc/oratab file as needed by
Database Configuration Assistant when a database is created
Finished running generic part of root.sh script.
Now product-specific root actions will be performed.
Finished product-specific root actions.
Adding entry to /etc/oratab file...
Finished execution of  /u01/app/oracle/Middleware/agent11g/root.sh ......
Then return to the Grid Control installation wizard and then click on Ok to continue.
20. The installation configuration assistants are now in progress. Please wait for this to complete.
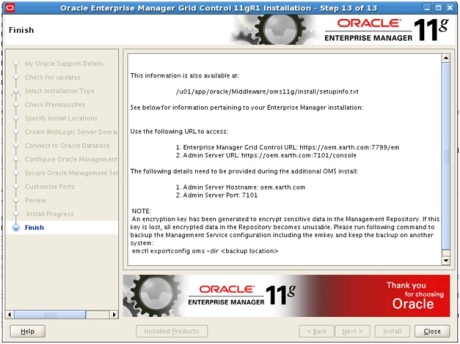
21. This now completes the installation. The following detail list how you can access the EM console and Adminstrator Console.
SECTION 6 – Post Installation Tasks
1. Add the following entries of the ORACLE_HOME for OMS and AGENT in the ORATAB file.
NOTE: On linux this is located under /etc/oratab
OMS:/u01/app/oracle/Middleware/oms11g:N
AGENT:/u01/app/oracle/Middleware/agent11g:N
2. Verify Web Tier is running:
oracle@oem[]$ . oraenv
ORACLE_SID = [] ? OMS
oracle@oem[OMS]$ export ORACLE_INSTANCE=/u01/app/oracle/gc_inst/WebTierIH1
oracle@oem[OMS]$ export PATH=$ORACLE_INSTANCE/bin:$PATH
oracle@oem[OMS]$ which opmnctl
/u01/app/oracle/gc_inst/WebTierIH1/bin/opmnctl
oracle@oem[OMS]$ opmnctl status -l
Processes in Instance: instance1
---------------------------------+--------------------+---------+----------+------------+----------+-----------+------
ias-component                    | process-type       |     pid | status   |        uid |  memused |    uptime | ports
---------------------------------+--------------------+---------+----------+------------+----------+-----------+------
ohs1                             | OHS                |   31912 | Alive    |   92828927 |   298032 |   0:42:33 | http:4889,https:4900,https:9999,https:7799,http:7788
3. Verify that OMS is running
oracle@oem[]$ . oraenv
ORACLE_SID = [] ? OMS
oracle@oem:[OMS]$ which emctl
/u01/app/oracle/Middleware/oms11g/bin/emctl
oracle@oem[OMS]$ emctl status oms
Oracle Enterprise Manager 11g Release 1 Grid Control
Copyright (c) 1996, 2010 Oracle Corporation.  All rights reserved.
WebTier is Up
Oracle Management Server is Up
3. Verify that Agent (OMA) is running
oracle@oem[]$ . oraenv
ORACLE_SID = [] ? AGENT
oracle@oem[AGENT] which emctl
/u01/app/oracle/Middleware/agent11g/bin/emctl
oracle@oem[AGENT] emctl status agent
Oracle Enterprise Manager 11g Release 1 Grid Control 11.1.0.1.0
Copyright (c) 1996, 2010 Oracle Corporation.  All rights reserved.
---------------------------------------------------------------
Agent Version     : 11.1.0.1.0
OMS Version       : 11.1.0.1.0
Protocol Version  : 11.1.0.0.0
Agent Home        : /u01/app/oracle/Middleware/agent11g
Agent binaries    : /u01/app/oracle/Middleware/agent11g
Agent Process ID  : 3462
Parent Process ID : 3439
Agent URL         : https://oem.earth.com:3872/emd/main/
Repository URL    : https://oem.earth.com:4900/em/upload
Started at        : 2010-10-21 20:51:47
Started by user   : oracle
Last Reload       : 2010-10-21 21:25:30
Last successful upload                       : 2010-10-21 21:32:08
Total Megabytes of XML files uploaded so far :    32.06
Number of XML files pending upload           :        0
Size of XML files pending upload(MB)         :     0.00
Available disk space on upload filesystem    :    66.86%
Last successful heartbeat to OMS             : 2010-10-21 21:31:12
---------------------------------------------------------------
Agent is Running and Ready
4. The EM and Weblogic Admin Console should now be accessible. For example:
| Description | URL | Super Administrator Accounts |
| EM Console | http://oem.earth.com:7788/em | sysman |
| Weblogic Admin Console | http://oem.earth.com:7101/console | weblogic |
NOTE: All hostname, IP addresses, URLs and ports mentioned above are used for demonstration purposes only.


