Creating Multiple TNS Aliases using a Response file May 29, 2013
Posted by tamnau in Database, General, Scripts, TNS.Tags: multiple entries, netca, response file, rsp, Service, silent, TNS, tnsnames.ora
add a comment
I often here DBAs run into TNS issues rambling on about:
“I can’t believe there was a missing bracket in the TNS entry”
or
“The syntax was incorrect in the TNS”.
Yes I admit, I have been one of those DBAs who has hacked away at the tnsnames.ora and has faced this issue in past. Although not widely known or used, there are solutions to this issue.
Solution A:
You can use the netca wizard, if you prefer to click away, however you need to ensure that you have X session enabled.
Solution B: (I prefer this option!)
A quicker and easy way of creating multiple entries for TNS is to use the netca response file with silent mode.
You can use the netca response file to create listener(s) as well but in this example, we will concentrate on looking at creating TNS aliases using a response file. This is not a new feature and has been available in previous versions of Oracle.
1. I want to create the following TNS alias entries for the following:

2. Take note of the following parameters
NSN_NUMBER – This is the number TNS alias(es) you want to create
NSN_NAMES – List all the TNS alias(es) names
NSN_SERVICE – List all the TNS service(s) associated with the TNS alias(es)
NSN_PROTOCOLS – List the protocol,host and port for each TNS alias
3. The following response file I will create is called 11203_netca.rsp and I have configured it as below:
##################### 11203_netca.rsp ######################

[GENERAL]

RESPONSEFILE_VERSION="11.2"

CREATE_TYPE="CUSTOM"

[oracle.net.ca]

INSTALL_TYPE=""custom""

NAMING_METHODS={"TNSNAMES","ONAMES","HOSTNAME"}

#--------------- Modify settings in this section ---------------

NSN_NUMBER=2

 NSN_NAMES={"GREY","GREY_STBY"}

 NSN_SERVICE={"GREY","GREY_STBY"}

 NSN_PROTOCOLS={"TCP;lnx161;1521","TCP;lnx162;1521"}

#---------------------------------------------------------------

#######################################################
4. Now execute the netca utility in silent mode using the response file (eg. 11203_netca.rsp)
oracle@lnx161:[GREY]$ netca /silent /responseFile /home/oracle/11203_netca.rsp
Output:
Parsing command line arguments:

Parameter "silent" = true

Parameter "responsefile" = /home/oracle/11203_netca.rsp

Done parsing command line arguments.

Oracle Net Services Configuration:

Warning: Oracle Restart is not running.

Listener configuration will not be registered/unregistered with Oracle Restart.

Default local naming configuration complete.

Created net service name: GREY

Default local naming configuration complete.

Created net service name: GREY_STBY

Profile configuration complete.

Oracle Net Services configuration successful. The exit code is 0
5. Verify that the TNS aliases GREY and GREY_STBY is now created in tnsnames.ora:
oracle@lnx161:[GREY]$ cat $TNS_ADMIN/tnsnames.ora
Output:
# tnsnames.ora Network Configuration File: /u01/app/oracle/11.2.0.3/db/network/admin/tnsnames.ora

# Generated by Oracle configuration tools.


GREY =

  (DESCRIPTION =

    (ADDRESS_LIST =

      (ADDRESS = (PROTOCOL = TCP)(HOST = lnx161)(PORT = 1521))

    )

    (CONNECT_DATA =

      (SERVICE_NAME = GREY)

    )

  )


GREY_STBY =

  (DESCRIPTION =

    (ADDRESS_LIST =

      (ADDRESS = (PROTOCOL = TCP)(HOST = lnx162)(PORT = 1521))

    )

    (CONNECT_DATA =

      (SERVICE_NAME = GREY_STBY)

    )

  )
6. Perform a tnsping for each TNS alias, to confirm entry is working.
a) TNS alias – GREY
oracle@lnx161:[GREY]$ tnsping GREY
Output:
TNS Ping Utility for Linux: Version 11.2.0.3.0 - Production on 29-MAY-2013 11:13:30


Copyright (c) 1997, 2011, Oracle. All rights reserved.


Used parameter files:

/u01/app/oracle/11.2.0.3/db/network/admin/sqlnet.ora

Used TNSNAMES adapter to resolve the alias

Attempting to contact (DESCRIPTION = (ADDRESS_LIST = (ADDRESS = (PROTOCOL = TCP)(HOST = lnx161)(PORT = 1521))) (CONNECT_DATA = (SERVICE_NAME = GREY)))

OK (0 msec)
a) TNS alias – GREY_STBY
oracle@lnx161:[GREY]$ tnsping GREY_STBY
Output:
TNS Ping Utility for Linux: Version 11.2.0.3.0 - Production on 29-MAY-2013 11:14:21


Copyright (c) 1997, 2011, Oracle. All rights reserved.


Used parameter files:

/u01/app/oracle/11.2.0.3/db/network/admin/sqlnet.ora

Used TNSNAMES adapter to resolve the alias

Attempting to contact (DESCRIPTION = (ADDRESS_LIST = (ADDRESS = (PROTOCOL = TCP)(HOST = lnx162)(PORT = 1521))) (CONNECT_DATA = (SERVICE_NAME = GREY_STBY)))

OK (0 msec)
7. This now completes the TNS alias configuration.
Sessions and Events in the Database April 9, 2013
Posted by tamnau in AWR, General, Performance, Scripts.Tags: ASH, Data Dictionary, Historical Data, Performance, Real time, Reports, Scripts
add a comment
Active Sessions
When you want to do a verification of current activity in the database, the following sos_sessions_active.sql script will list information on active sessions, blockers, associated events, impacted objects, users, program and services that are currently running across all instance(s) in the database (i.e. this script can run against a single instance or RAC database).
An example of this report can be found here:
(Click on image to zoom in)
Historical Sessions
At times, identifying performance issues in real time can be challenging. By the time the DBA is called upon to investigate the issue disappears. Rather then waiting for the issue to resurface, with Active Session History introduced in 10g, the feature has become invaluable source to allow DBAs to perform post analysis and of sessions captured in the past.
Using the sos_sessions_history.sql script, by specifying the time period you wish to review, the report will return details on sessions and associated events.
NOTE: The columns “machine” and “sql_opname” is not available to be reported against DBA_HIST_ACTIVE_SESS_HISTORY in version 10g and 11.1. So the sos_sessions_history.sql script will be required to edited to remove these columns from the query is executing against versions earlier then 11.2.
A snippet from a sample output can be found here:
(Click on image to zoom in)
ASMCMD Wrapper … For the Frequent ASM administrator December 6, 2011
Posted by tamnau in 11g, General.Tags: 11g, ASM, ASMCMD, Disk Group, General, Storage
add a comment
In the pre-11g days of ASM, I was hesitant to use ASMCMD (command line utility to perform ASM tasks)… perhaps in its earlier days, it was a combination of limited functionality and my comfort in connecting to the ASM instance via sqlplus to perform administrative tasks. But now in 11g, I have grown the desire to use ASMCMD and have found it to be more useful then I have first envisaged.
In 11g, some of the new functionality now offered through ASMCMD includes the ability to perform:
- startup and shutdown of ASM instance
- backup (md_backup) and restore (md_restore) of asm metadata
- list open files (lsof)
- verify disk usage (du)
- change/alter (chdg) disks in disk groups
For a comprehensive list of ASMCMD commands, you can refer to Oracle 11.2 Database Storage Administrator’s Guide.
With the more frequent use of ASMCMD, I got tired of switching between the ASM environment and DB environment settings, as a result, I have created an ASM wrapper script which calls asmcmd (ie. works when ASM is mounted or running) with the ability to preserve your DB environment setting.
Example of using this script are provided below.
Change to the directory to where the script sos_asm.sh was downloaded to and set executable permission accordingly:
[oracle@lnx01] cd /home/oracle/scripts

[oracle@lnx01] chmod +x sos_asm.sh
Example 1: Using the sos_asm.sh script, I performed an ASM metadata backup using asmcmd but also was able to preserve database environment settings for the database called BLUE.
[oracle@lnx01] export ORACLE_SID=BLUE; . oraenv

[oracle@lnx01] cd /home/oracle/scripts

[oracle@lnx01] ./sos_asm.sh md_backup /home/oracle/asm_backup/dgbk_DG_DATA -G DG_DATA

[oracle@lnx01] sqlplus / as sysdba

SQL*Plus: Release 11.2.0.2.0 Production on Wed Jul 20 23:09:31 2011

Copyright (c) 1982, 2010, Oracle. All rights reserved.

Connected to:

Oracle Database 11g Enterprise Edition Release 11.2.0.2.0 - 64bit Production

With the Partitioning, OLAP, Data Mining and Real Application Testing options

SQL> select sys_context('USERENV','DB_NAME') DB from dual;

DB

-----------

BLUE
Viewing Realtime Alert Log via ADRCI June 8, 2011
Posted by tamnau in 11g, ADR, General.Tags: 11g, ADR, ADRCI, adr_base, alert log, diag_dest, General
1 comment so far
ADR (Automatic Diagnostic Repository) was introduced in 11g and is a datastore for diagnostic information for oracle components such as database, asm, listener and scan listeners. It stores trace files, logs in both clear text and xml format.
ADR does allow the capability to see alert (and listener) logs in realtime.
For example if I wanted to view in realtime the alert log for Database called RED, I would do the following:
[oracle@lnx01] export ORACLE_SID=RED; . oraenv

[oracle@lnx01] adrci

adrci> set home RED

adrci> show alert -tail -f
If you have multiple ADR homes and wish to quickly switch between alert or listener logs, I have created a script which can be downloaded called sos_alert.sh.
Example of using this script are provided below, but first change to directory to where sos_alert.sh was downloaded to and set executable permission accordingly:
[oracle@lnx01] cd /home/oracle/scripts

[oracle@lnx01] chmod +x sos_alert.sh
Example 1: To view alert log for the database named “RED”
[oracle@lnx01] ./sos_alert.sh RED
Example 2: To view alert log for ASM
[oracle@lnx01] ./sos_alert.sh +ASM
Example 3: To view listener log for listener named “LISTENER”
[oracle@lnx01] ./sos_alert.sh LISTENER
Example 4: To view listener log for scan listener named “LISTENER_SCAN1”
[oracle@lnx01] ./sos_alert.sh LISTENER_SCAN1
Cluster Resource Control Filters May 3, 2011
Posted by tamnau in 11g, RAC.Tags: 11.2, 11g, crs, crsctl, crsctl -w, crsctl filter, Database 11gR2, Grid Infrastructure, Oracle, RAC, status
1 comment so far
In 11.2 RAC, to avoid listing all cluster resources, you can use the filter switch option “-w”. This can be useful if you only want to look at a specific status of a given resource.
A. List for All Databases Managed by Cluster
In the example, shows the listing of status for all databases managed by the cluster.
[oracle@lnx01] export ORACLE_SID=GRID; . oraenv

[oracle@lnx01] crsctl stat res -t -w "TYPE = ora.database.type"
The output for the above example is as follows:
--------------------------------------------------------------------------------

NAME           TARGET  STATE        SERVER                   STATE_DETAILS

--------------------------------------------------------------------------------

Cluster Resources

--------------------------------------------------------------------------------

ora.salt.db

      1        ONLINE  ONLINE       lnx01                 Open

      2        ONLINE  ONLINE       lnx02                 Open

ora.pepper.db

      1        ONLINE  ONLINE       lnx01                 Open

      2        ONLINE  ONLINE       lnx02                 Open
A list below are some type of resources that the filter can set for:
NOTE: The filter from the example can be change from “ora.database.type” to “ora.service.type”. For more options see listing below.
[oracle@lnx01] crsctl stat res |grep "TYPE=" |uniq
Sample output:
TYPE=ora.diskgroup.type

TYPE=ora.listener.type

TYPE=ora.scan_listener.type

TYPE=ora.diskgroup.type

TYPE=application

TYPE=ora.asm.type

TYPE=ora.cluster_vip_net1.type

TYPE=ora.cvu.type

TYPE=ora.database.type

TYPE=ora.service.type

TYPE=ora.database.type

TYPE=ora.service.type

TYPE=ora.gsd.type

TYPE=ora.network.type

TYPE=ora.oc4j.type

TYPE=ora.ons.type

TYPE=ora.scan_vip.type

TYPE=ora.database.type
B. Check Cluster Resources that are offline
Example:
[oracle@lnx01] crsctl stat res -t -w "STATE = OFFLINE"
NOTE: If not using GSD, then it is ok for the following resource to be offline.
Sample output
--------------------------------------------------------------------------------

NAME           TARGET  STATE        SERVER                   STATE_DETAILS

--------------------------------------------------------------------------------

Local Resources

--------------------------------------------------------------------------------

ora.gsd

OFFLINE OFFLINE      lnx01

OFFLINE OFFLINE      lxn02
C. Verifying local resources that are online
Example:
[oracle@lnx01] crsctl stat res -init -t -w "STATE = ONLINE"
NOTE: You can use “-init” to check Local Resources
Sample Output
--------------------------------------------------------------------------------

NAME           TARGET  STATE        SERVER                   STATE_DETAILS

--------------------------------------------------------------------------------

Cluster Resources

--------------------------------------------------------------------------------

ora.asm

1        ONLINE  ONLINE       lnx01                 Started

ora.cluster_interconnect.haip

1        ONLINE  ONLINE       lnx01

ora.crf

1        ONLINE  ONLINE       lnx01

ora.crsd

1        ONLINE  ONLINE       lnx01

ora.cssd

1        ONLINE  ONLINE       lnx01

ora.cssdmonitor

1        ONLINE  ONLINE       lnx01

ora.ctssd

1        ONLINE  ONLINE       lnx01                 OBSERVER

ora.diskmon

1        ONLINE  ONLINE       lnx01

ora.drivers.acfs

1        ONLINE  ONLINE       lnx01

ora.evmd

1        ONLINE  ONLINE       lnx01

ora.gipcd

1        ONLINE  ONLINE       lnx01

ora.gpnpd

1        ONLINE  ONLINE       lnx01

ora.mdnsd

1        ONLINE  ONLINE       lnx01
D. To check for resources that are Not Online
When I run the “crsctl stat res -t” and it print lines and lines that go on forever of all the resources for your cluster, I find that at times you can easily oversee resources that are in a pending or bad status that need special attention. Don’t get me wrong, it is nice to know about all your resources. However, there is a better way that you can do a status check, and report only the pending or bad resources.
Note that the “crsctl stat res -t -w “((TARGET = OFFLINE) or (STATE = OFFLINE)” will only report resources with the OFFLINE target or state. It will not report other target or state information. Hence I will show you below in an example on how to capture resources with pending (starting, intermediate) or bad (offline, unknown etc…) status. Therefore I want to report all resources with the target or state that is not ONLINE. In addition, I want to also exclude that annoying gsd (ora.gsd) resource from the check, as we are not hosting any oracle 9i RAC database on this cluster, therefore the target and state for this resource will always show as being offline.
Example: [oracle@lnx01] crsctl stat res -t -w "((TARGET != ONLINE) or (STATE != ONLINE) and TYPE != ora.gsd))"
NOTE: No output is shown if cluster is up and running. Otherwise impacted resources will be displayed.
OPatch Friendly May 3, 2011
Posted by tamnau in General.Tags: 6880880, crs, Database, daylight savings time, DST, General, lsinventory, OPatch, Oracle, ORACLE_HOME, patchset updates, PSU, rolling patch
1 comment so far
OPatch utility now has just got a little fancier and more user friendly. Download latest OPatch (Patch 6880880) for the Oracle software release (eg. 10.2, 11.1, 11.2) from My Oracle Support and extract to the appropriate Oracle software directory.
NOTE: The OPatch utility can be applied to Database, Grid Control (OMS and Agent), Grid Infrastructure (ASM and CRS) software home directories.
In the below example the database software release is 11.2 and runs on Linux 64 bit platform, so to update the OPatch utility, the patch file 6880880_112000_Linux-x86-64.zip was downloaded.
Below are just a few examples of what you can now do with the more recent versions of OPatch.
A. To download and install latest OPatch version
1. Verify the version of OPatch currently installed, simply run:
SYNTAX:
export ORACLE_SID=<ORACLE_SID>; . oraenv

$ORACLE_HOME/OPatch/opatch version
EXAMPLE:
[oracle@lnx01] export ORACLE_SID=112DB; . oraenv

$ORACLE_HOME/OPatch/opatch version
2. Backup old OPatch utility:
[oracle@lnx01] mv $ORACLE_HOME/OPatch $ORACLE_HOME/OPatch.orig
3. Extract and install latest OPatch to Oracle home directory:
SYNTAX:
unzip p6880880_<RELEASE>_<OS_PLATFORM>.zip –d $ORACLE_HOME
EXAMPLE:
[oracle@lnx01] unzip p6880880_112000_Linux-x86-64.zip -d $ORACLE_HOME
4. Re-run step 1 from this section to verify new version of OPatch
B. List Detailed Information About a Patch Before Applying It
The OPatch utility can be used to verify details of a patch before proceeding to apply to the Oracle Home directory.
Such information that can verified but not limited to are:
• Check if patch is a Rolling Patch
• Check if patch is a Patchset Update (PSU)
• Check if patch can be run with “opatch auto” option
• Check OS platform the patch can be applied on
• Actual actions and/or steps that patch contains without applying the patch. This include detailed information of files it touches, copies and relinks.
SYNTAX:
$ORACLE_HOME/OPatch/opatch query -all |more
EXAMPLE 1:
[oracle@lnx01] cd /home/oracle/download/patches/12311357

[oracle@lnx01] $ORACLE_HOME/OPatch/opatch query -all |more
C. Looking for a Particular Patch Already Applied based on a Bug or Patch Description
To search for a patch based on search string, OPatch can list a detailed description of each patch applied to the Oracle home directory.
SYNTAX:
$ORACLE_HOME/OPatch/opatch lsinventory -bugs_fixed |grep –i "<string>"
This is particularly handy if you want to look for a Patchset Update (PSU) or Daylights Savings Time (DST) patch.
EXAMPLE 1:
[oracle@lnx01] $ORACLE_HOME/OPatch/opatch lsinventory -bugs_fixed |grep –i “DATABASE PSU”
EXAMPLE 2:
[oracle@lnx01] $ORACLE_HOME/OPatch/opatch lsinventory -bugs_fixed |grep –i “DST”
D. Cleanup Patch Storage to Reclaim Space
OPatch can now determine and cleanup files in the patch storage that are no longer required. To do so run the following:
SYNTAX / EXAMPLE:
[oracle@lnx01] $ORACLE_HOME/OPatch/opatch util cleanup
Oracle Backup and Recovery for a VLDB (Very Large Database) February 10, 2011
Posted by tamnau in Database, General, RMAN.Tags: BCT, Block Change Tracking, Copy of Database, Database, Fast Incremental, General, Incremental Merge, Incremental Update, Oracle, Recover of Copy, RMAN, Roll Forward, Tag, VLDB
4 comments
There is an ongoing focus for businesses to minimise downtime and increase operational continuity. With such challenges, IT staff are constantly under pressure to meet such demands. For DBAs, backup and recovery is one of the key areas which can be reviewed to ensure that a faster approach to recovery can be achieved to reduce downtime.
An RMAN feature called Incremental Merge (also referred to as Incremental Updated) Backups can significantly reduce recovery time if configured correctly. Perhaps not as widely used but has been around since 10g, it is the ideal backup methodology for a VLDB (Very Large Database). How it works is that the image copies of the data files are created and incrementals are then applied rolling forward the image copies after each backup operation. It is also important to enable fast incremental backups with BCT (Block Change Tracking). For more detailed information on BCT, please refer to the Pythian Whitepaper written by Alexander Gorbachev.
The table below lists the configuration that will be used for the following demonstration:
| Description | Value |
| Database Instance | ORACLE_SID=VLDB |
| Host | lnx01.earth.com |
| RMAN Catalog DB (TNS Name) | RMANCAT |
| RMAN Catalog User | rman |
SECTION 1 – CONFIGURE BLOCK CHANGE TRACKING
1. To create block change tracking file, run the command in sqlplus as sysdba:
SQL> ALTER DATABASE ENABLE BLOCK CHANGE TRACKING

USING FILE '<path_to_block_change_file_name>';
For example:
ALTER DATABASE ENABLE BLOCK CHANGE TRACKING

USING FILE '/u02/oradata/VLDB/bct_VLDB.ctf';
IMPORTANT NOTE: If running in a RAC configuration, the following file needs to be placed on the cluster shared file system.
2. Login to database and verify the location of data files.
[oracle@lnx01] export ORACLE_SID=VLDB; . oraenv

[oracle@lnx01] sqlplus / as sysdba

SQL> col file_name form a75

SQL> select file_id, file_name from dba_data_files

/

FILE_ID FILE_NAME

---------- --------------------------------------------------

1 /u02/oradata/VLDB/o1_mf_system_7o8kj2gt_.dbf

2 /u02/oradata/VLDB/o1_mf_sysux_2o3mt9jl_.dbf

3 /u02/oradata/VLDB/o1_mf_undotbs_1c5gb8nh_.dbf

4 /u02/oradata/VLDB/o1_mf_users_5v5db3vv_.dbf
SECTION 2 – CONFIGURE RMAN PARAMETERS
1. Register database with RMAN Catalog if using Catalog mode. See example here.
2. Connect to RMAN in catalog (or no catalog) mode.
[oracle@lnx01] export ORACLE_SID=VLDB; . oraenv

[oracle@lnx01] rman target / catalog rman/@RMANCAT
3. Configure the preferred RMAN Recovery Window. In the example, the recovery window will be 3 days.
RMAN> CONFIGURE RETENTION POLICY TO RECOVERY WINDOW OF 3 DAYS;
4. It is also recommended that you enable autobackup of controlfile in RMAN.
RMAN> CONFIGURE CONTROLFILE AUTOBACKUP ON;
SECTION 3 – Performing the Incremental Merge (Updated) Backup
1. Perform the backup of the database in RMAN, and this will create an image copy on the initial run otherwise it will apply the incrementals and rolls forward the image copies of data files.
RMAN> run

{

sql 'alter system archive log current';

recover device type disk

copy of database with tag 'MIB_UPDATE';

backup incremental level 1

for recover of copy with tag 'MIB_UPDATE' database;

sql 'alter system archive log current';

}

list copy of database tag 'MIB_UPDATE';

list backup tag 'MIB_UPDATE';
2. Repeat the previous step for any future or subsequent backups.
SECTION 4 – Performing the Recovery from Incremental Merge (Updated) Backup
An unexpected outage has occurred and now a recovery is required to be performed to bring the database back up quickly as possible.
1. To perform the database recovery ensure that the database in MOUNT mode.
[oracle@lnx01] export ORACLE_SID=VLDB; . oraenv

[oracle@lnx01] sqlplus / as sysdba

SQL> shutdown abort

SQL> startup mount
2. In RMAN, switch database to use image copy and then perform recovery.
RMAN> set echo on;

switch database to copy;

run {

recover database;

alter database open;

}
3. Login to database and verify the location of data files are pointing to the recovered image copies.
[oracle@lnx01] export ORACLE_SID=VLDB; . oraenv

[oracle@lnx01] sqlplus / as sysdba

SQL> col file_name form a75

SQL> select file_id, file_name from dba_data_files

/

FILE_ID FILE_NAME

---------- --------------------------------------------------

1 /u03/orafra/VLDB/datafile/o1_mf_system_6o7mj1gt_.dbf

2 /u03/orafra/VLDB/datafile/o1_mf_sysaux_6o7mj4j9_.dbf

3 /u03/orafra/VLDB/datafile/o1_mf_undotbs1_6o7ml4yx_.dbf

4 /u03/orafra/VLDB/datafile/o1_mf_users_6o7mlhl4_.dbf
SECTION 5 – Switching database files back to original data file location
As the database is continuing to run from where the recovered image copies are located, there may be a desire to restore it back to its original location. This is optional, however it is recommended if you are running image copies from FRA (Fast Recovery Area).
1. Backup the database in RMAN
RMAN> run

{

ALLOCATE CHANNEL d1 TYPE DISK FORMAT '/u02/oradata/VLDB/%U.dbf';

recover

copy of database with tag 'MIB_RELOCATE';

backup incremental level 1

for recover of copy with tag 'MIB_RELOCATE' database;

release channel d1;

}

list copy of database tag 'MIB_RELOCATE';

list backup tag 'MIB_RELOCATE';
NOTE: If this is the first time of running the backup to new location, it will create the image copies of the datafiles.
2. Repeat the previous step for any future or subsequent backups until a time can be scheduled to switch back.
3. When a planned time has been scheduled and switch back can be performed, shutdown database and startup in MOUNT mode.
[oracle@lnx01] export ORACLE_SID=VLDB; . oraenv

[oracle@lnx01] sqlplus / as sysdba

SQL> shutdown immediate

SQL> startup mount
4. Switch database to use image copy and then perform recovery. The database will now be started using image copies which is now configure in the original data file location.
RMAN> set echo on;

switch database to copy;

run {

recover database;

alter database open;

}
5. Login to database and verify the data files are pointing to the recovered image copies back in the original location (or directory).
[oracle@lnx01] export ORACLE_SID=VLDB; . oraenv

[oracle@lnx01] sqlplus / as sysdba

SQL> col file_name form a75

SQL> select file_id, file_name from dba_data_files

/

FILE_ID FILE_NAME

---------- --------------------------------------------------

1 /u02/oradata/VLDB/data_D-VLDB_I-2643384069_TS-SYSTEM_FNO-1_cim4edhc.dbf

2 /u02/oradata/VLDB/data_D-VLDB_I-2643384069_TS-SYSAUX_FNO-2_cjm4edig.dbf

3 /u02/oradata/VLDB/data_D-VLDB_I-2643384069_TS-UNDOTBS1_FNO-3_ckm4edjj.dbf

4 /u02/oradata/VLDB/data_D-VLDB_I-2643384069_TS-USERS_FNO-4_clm4edk2.dbf
CONSIDERATIONS
In conclusion, it is worth noting that when using RMAN Incremental Merge (Updated) Backup strategy, it is important to consider the following:
- More storage is required to store the copy of database in addition to the traditional incremental backups.
- For Point-In-Time recovery, continue to at least perform one full backup of database and include archive logs. This can be can be performed less frequently (ie weekly, fortnightly, monthly).
- Validate image copies and backups to detect if there is corruption or missing files which may compromise recovery.
- Image copies of database should be on same storage tier as online data files to ensure performance it is not impacted when switching to database copy for recovery.
- Image copies do not have to be stored in FRA, but should be stored on disk.
Installing 11.1 Enterprise Manager Grid Control October 23, 2010
Posted by tamnau in General.Tags: emctl, Enterprise Manager, General, Grid Control, oma, omr, oms, opmnctl, sysman, web logic, wls
4 comments
Grid Control 11g interface may have the same look and feel as the Grid Control 10g, but under the hood it is quite different. In version 10g, the OMS was a J2EE (OC4J) application deployed on the Oracle Application Server. Whereas in version 11g, the OMS is deployed on Web Logic Server (WLS) .
For this post, I have provided some simple steps on how to install the Grid Control with minimal pain.
The table below lists the configuration that will be used for the following demonstration.
| Product Software | Version | Host | Environment Settings |
| GC Repository Home | 11.2.0.1 | mama.earth.com | ORACLE_HOME=/u01/app/oracle/product/11.2.0/db_1 |
| GC Repository SID | 11.2.0.1 | mama.earth.com | ORACLE_SID=GCREP |
| JDK | 1.6 Update 18 | oem.earth.com | JDK_HOME=/u01/jdk16 |
| Middleware Home | 11.1.0.1 | oem.earth.com | MW_HOME=/u01/app/oracle/Middleware |
| Webtier | 11.1.1.2 | oem.earth.com | WT_HOME=/u01/app/oracle/Middleware/Oracle_WT |
| Web Logic Server (WLS) Home | 10.3.2.0 | oem.earth.com | WL_HOME=/u01/app/oracle/Middleware/wlserver_10.3 |
| WLS Instance Base | 10.3.2.0 | oem.earth.com | WLS_INSTANCE_BASE=/u01/app/oracle/gc_inst |
| WLS Instance Home | 10.3.2.0 | oem.earth.com | ORACLE_INSTANCE=/u01/app/oracle/gc_inst/WebTierIH1 |
| WLS Domain (GCDomain) | 10.3.2.0 | oem.earth.com | WLS_DOMAIN=/u01/app/oracle/gc_inst/user_projects/domains/GCDomain |
| OMS | 11.1.0.1 | oem.earth.com | ORACLE_HOME=/u01/app/oracle/Middleware/oms11g |
| Agent | 11.1.0.1 | oem.earth.com | ORACLE_HOME=/u01/app/oracle/Middleware/agent11g |
* SYSMAN is actually the application schema created in the GC. This is also the super administrator for logging into the EM Console.
SECTION 1 –PRE- INSTALLION TASKS
1. Verify the OS platform and supported Database version for the Grid Control Repository that is intended to be installed is supported. See My Oracle Support Note 412431.1 for further details.
2. Install the Database software and create a Database for the Grid Control Repository. A good example can be found here:
http://blog.ronnyegner-consulting.de/2009/09/14/oracle-11g-release-install-guide-install-single-database
NOTE: When creating the database do not configure Enterprise Manager during this step.
3. As per Grid Control installation manual, make sure the pre-requisites are met as mentioned at:
http://download.oracle.com/docs/cd/E11857_01/install.111/e15838/install_em_exist_db.htm#CIAIEAAC
NOTE: For this exercise, the repository was created on mama.earth.com and service name is GCREP
SECTION 2 – INSTALL JDK SOFTWARE
4. Download JDK 1.6 (6.0) from http://java.sun.com/products/archive/
NOTE: According to My Oracle Support Note 1063762.1 make sure that the JDK version 1.6 Update 18 is used for installation of WebLogic on Linux 64-bit (x86_64) platform.
5. Create the base directory for JDK and copy the file jdk-6u18-<os_platform>.bin to the new directory.
oracle@oem[]$ mkdir -p /u01/jdk16
oracle@oem[]$ cp –rp jdk-6u18-linux-x64.bin /u01/jdk16
6. Run the JDK installation
oracle@oem[]$ cd /u01/jdk16
oracle@oem[]$ ./jdk-6u18-linux-x64.bin
7. Reivew the License Agreement and then click on <SPACE BAR> to continue until the following prompt is reached:
Do you agree to the above license terms? [yes or no]
8. Type yes to continue
yes
9. Click on <ENTER> to continue
Press Enter to continue.....
10. This should now complete the installation for JDK.
Done.
11. Verify that the new JDK directory jdk1.6.0_18 has been created.
oracle@oem[]$ ls
jdk1.6.0_18
SECTION 3 – WEBLOGIC INSTALLATION
1. Download WebLogic Server software from http://www.oracle.com/technology/software/products/ias/htdocs/wls_main.html
NOTE: For this example, the installation will be performed on linux 64-bit platform, hence the Generic file version will be downloaded. If running windows (32bit – x86) or Sun (64bit – SPARC) then please download the alternative as listed below.
2. Set Local Display and then run via an X session to host:
oracle@oem[]$ xhost +
oracle@oem[]$ ssh <weblogic_host>
oracle@oem[]$ export DISPLAY=<LOCAL_DISPLAY>:<DISPLAY_NO>
Example:
oracle@oem[]$ xhost +
oracle@oem[]$ ssh oem.earth.com
oracle@oem[]$ export DISPLAY=laptop:0
3. Set JAVA Home to where the JDK installation path and then run the WebLogic Installer
oracle@oem[]$ export JAVA_HOME=/u01/jdk16/jdk1.6.0_18
oracle@oem[]$ $JAVA_HOME/bin/java -d64 -jar wls1032_generic.jar
4. The WebLogic Installer screen now appears, to continue click on Next.
5. Enter a new Middleware Home Directory (eg. /u01/app/oracle/Middleware) and then click on Next.
6. Register for Security Updates, leave default and click on Next.
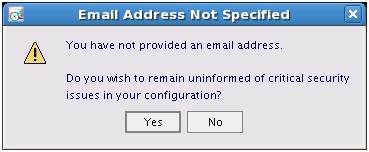
7. To continue click on Yes, if you wish to ignore setup for notification of security updates.
8. To skip configuration and continue to ignore setup for notification of security updates click on Yes.
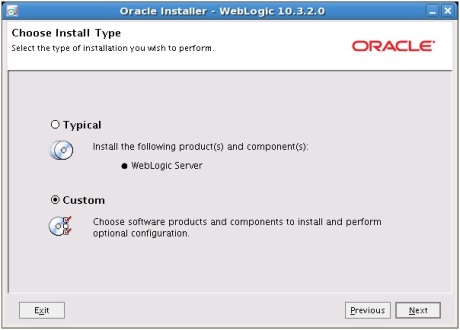
9. Select Typical for the installation type to perform and then click on Next.
10. Leave default options selected for Products and Components and then click on Next.
11. Verfy the JDK installed has been detected by the Oracle Installer for WebLogic and then click on Next.
12. Verify the default Product Home for WebLogic Server (eg. /u01/app/oracle/Middleware/wlserver_10.3) and the click on Next.
13. Review the Installation Summary and click on Next.
14. Installation is now in progress …. Please wait
15. Installation is now complete, deselect the option Run Quickstart and then click on Done.
SECTION 4 – WEBLOGIC WDJ7 PATCH INSTALLATION (USING SMART UPDATE)
It is strongly recommended that the Weblogic patch WDJ7 patch is applied before installing the Grid Control 11g software.
1. Set the JAVA_HOME:
oracle@oem[]$ export JAVA_HOME=/u01/jdk16/jdk1.6.0_18
2. Change directory to the BSU utility directory:
oracle@oem[]$ cd /u01/app/oracle/Middleware/utils/bsu
oracle@oem[]$ ./bsu.sh
3. Enter My Oracle Support* User Credentials.
NOTE: * Requires a valid support profile registered with http://support.oracle.com
4. Please wait as eSupport validates the user credentials.
5. This will refresh the library of patches available for download.
6. Complete registration for security updates or you may ignore and click on Continue.
7. To continue click on Yes, if you wish to ignore setup for notification of security updates
8. To skip configuration and continue to ignore setup for notification of security updates click on Yes.
9. The Smart Update Screen should now appear. Go to the Get Patches tab and select the WDJ7 patch and then click on Download Selected.
NOTE: Highlight Patches from the top menu and then select on Refresh View to get the latest listing of patches available for download.
10. Say Yes, to check for conflict of each patch and then click on Ok.
11. Please wait for validation to be completed and then click on Ok.
12. The WDJ7 patch has now downloaded.
13. Click on the Manage Patches, Then click on the button for WDJ7 patch located under the Apply column.
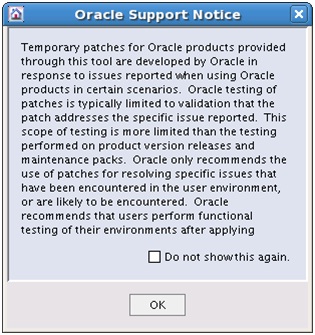
14. Review Oracle Support notice information regarding patches, and then click on Ok to continue.
15. Please wait for validation to be completed and then click on Ok.
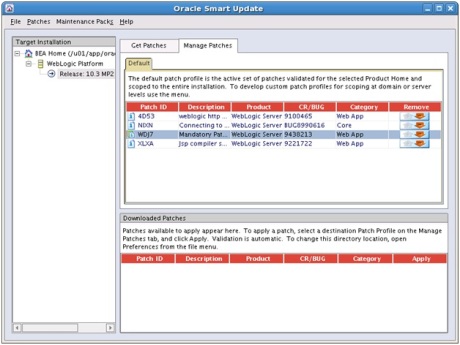
16. The patch should now appear in the top window of the Manage Patches tab. This verifies that the patch WDJ7 has been applied successfully.
17. This completes the patch update and the Smart Update program for WebLogic can be closed. Click on File and then on Exit.
SECTION 5 – Install Grid Control Software
1. Downloaded the software for 11gR1 Grid Control from:
http://www.oracle.com/technetwork/oem/grid-control/downloads/index.html
(NOTE: Under the Full Installers (Agent,Repository, OMS and Management Packs) section, download for the appropriate files for your platform. In this demonstration the Linux 64 bit version will be the example used.)
2. Extract all files in the same directory where the files were downloaded to:
oracle@oem[]$ unzip GridControl_11.1.0.1.0_Linux_x86-64_1of3.zip
oracle@oem[]$ unzip GridControl_11.1.0.1.0_Linux_x86-64_2of3.zip
oracle@oem[]$ unzip GridControl_11.1.0.1.0_Linux_x86-64_3of3.zip
3. Set Local Display and then run via an X session to host:
oracle@oem[]$ xhost +
oracle@oem[]$ ssh <weblogic_host>
oracle@oem[]$ export DISPLAY=<LOCAL_DISPLAY>:<DISPLAY_NO>
Example:
oracle@oem[]$ xhost +
oracle@oem[]$ ssh oem.earth.com
oracle@oem[]$ export DISPLAY=laptop:0
4. In the same directory where files were extracted to, execute the runInstaller to launch the Grid Control Installation Wizard:
Option 1
Run with no variable set:
oracle@oem[]$ cd install
oracle@oem[]$ ./runInstaller
Option 2
If the server has multiple hostname or alias of where the Grid Control installation is to be installed to, the ORACLE_HOSTNAME can be used to forced the Grid Control to use the preferred name
oracle@oem[]$ ./runInstaller ORACLE_HOSTNAME=<PREFERRED_NAME>
For example:
oracle@oem[]$ ./runInstaller ORACLE_HOSTNAME=oem.earth.com
5. The Grid Control Installer screen now appears.
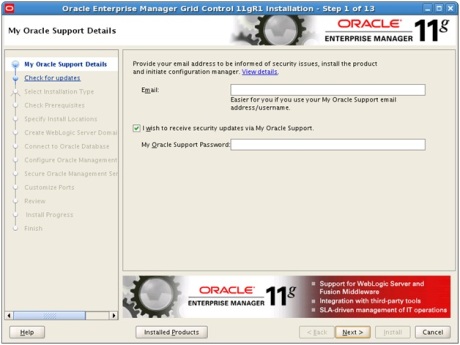
6. Register for Security Updates or leave default and click on Next.
7. To continue click on Yes, if you wish to ignore setup for notification of security updates

8. Leave default to Skip Software Updates and click on Next.
9. The default option of Install a new Enterprise Manager system is selected. Click on Next to continue.
10. Prerequisite checks will be performed.
11. Any failures or warning will be reported. Resolve issues according and click on Next.
12. Enter Passwords for the Weblogic Domain Administrator (weblogic) and Node Manager (nodemanager) and then click on Next.
13. Enter the database connection details for where the Grid Control Repository will be deployed to.
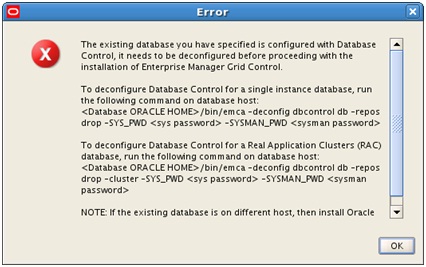
If the following error message below is reported, the installation has detected existing metadata objects in the Database for DB control. Otherwise continue on to the next step.
NOTE: The DB control (standalone Enterprise Manager) may have been installed when the database was created)
To deinstall DB control repository, run the following in a new terminal session on the database host of where the Grid Control Repository will reside:
oracle@mama[]$ export ORACLE_SID=GCREP; . oraenv
ORACLE_SID = [GCREP] ?
oracle@mama[GCREP]$ emca -deconfig dbcontrol db -repos drop -SYS_PWD oracle -SYSMAN_PWD oracle
STARTED EMCA at Aug 25, 2010 7:55:09 PM
EM Configuration Assistant, Version 11.2.0.0.2 Production
Copyright (c) 2003, 2005, Oracle.  All rights reserved.
Enter the following information:
Database SID: GCREP
Listener port number: 1521
Do you wish to continue? [yes(Y)/no(N)]: yes
Aug 25, 2010 7:55:27 PM oracle.sysman.emcp.EMConfig perform
INFO: This operation is being logged at /u01/app/oracle/cfgtoollogs/emca/GCREP/emca_2010_08_25_19_55_08.log.
Aug 25, 2010 7:55:27 PM oracle.sysman.emcp.EMDBPreConfig performDeconfiguration
WARNING: EM is not configured for this database. No EM-specific actions can be performed.
Aug 25, 2010 7:55:27 PM oracle.sysman.emcp.ParamsManager checkListenerStatusForDBControl
WARNING: Error initializing SQL connection. SQL operations cannot be performed
Aug 25, 2010 7:55:27 PM oracle.sysman.emcp.EMReposConfig invoke
INFO: Dropping the EM repository (this may take a while) ...
Aug 25, 2010 7:58:04 PM oracle.sysman.emcp.EMReposConfig invoke
INFO: Repository successfully dropped
Enterprise Manager configuration completed successfully
FINISHED EMCA at Aug 25, 2010 7:58:05 PM
Then return to the Grid Control Installation wizard to continue.
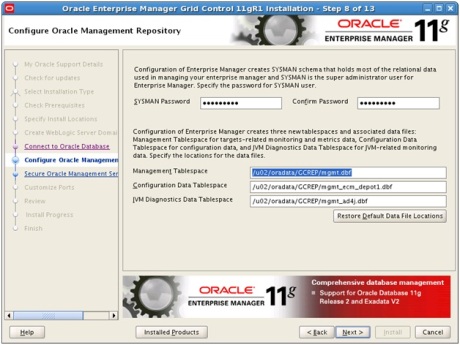
14. Set the sysman password and verify that the location of where the tablespaces will be created and then click on Next.
15. Set the registration password for securing communications in Grid Control. Uncheck the option for “Allow only secure access to the console” and then click on Next.
NOTE: This is the password that will be used to secure and register agents with the OMS.
16. Reconfigure ports as required, otherwise leave default and click on Next.
NOTE: Make sure that ports are accessible across the network. Enable firewall policies if required.
17. Review the Grid Control installation summary and then click on Install.
18. Installation is now in progress, please wait …
19. The root configuration scripts needs to be executed as recommended before proceeding.
In a new terminal session, as the super equivalent user (eg. root) execute the allroot.sh script.
root@oem[]# /u01/app/oracle/Middleware/oms11g/allroot.sh
Starting to execute allroot.sh .........
Starting to execute /u01/app/oracle/Middleware/oms11g/root.sh ......
Running Oracle 11g root.sh script...
The following environment variables are set as:
ORACLE_OWNER= oracle
ORACLE_HOME=  /u01/app/oracle/Middleware/oms11g
Enter the full pathname of the local bin directory: [/usr/local/bin]:
The file "dbhome" already exists in /usr/local/bin.  Overwrite it? (y/n)
[n]: y
Copying dbhome to /usr/local/bin ...
The file "oraenv" already exists in /usr/local/bin.  Overwrite it? (y/n)
[n]: y
Copying oraenv to /usr/local/bin ...
The file "coraenv" already exists in /usr/local/bin.  Overwrite it? (y/n)
[n]: y
Copying coraenv to /usr/local/bin ...
Entries will be added to the /etc/oratab file as needed by
Database Configuration Assistant when a database is created
Finished running generic part of root.sh script.
Now product-specific root actions will be performed.
Adding entry to /etc/oratab file...
Finished execution of  /u01/app/oracle/Middleware/oms11g/root.sh ......
Starting to execute /u01/app/oracle/Middleware/agent11g/root.sh ......
Running Oracle 11g root.sh script...
The following environment variables are set as:
ORACLE_OWNER= oracle
ORACLE_HOME=  /u01/app/oracle/Middleware/agent11g
Enter the full pathname of the local bin directory: [/usr/local/bin]:
The file "dbhome" already exists in /usr/local/bin.  Overwrite it? (y/n)
[n]: y
Copying dbhome to /usr/local/bin ...
The file "oraenv" already exists in /usr/local/bin.  Overwrite it? (y/n)
[n]: y
Copying oraenv to /usr/local/bin ...
The file "coraenv" already exists in /usr/local/bin.  Overwrite it? (y/n)
[n]: y
Copying coraenv to /usr/local/bin ...
Entries will be added to the /etc/oratab file as needed by
Database Configuration Assistant when a database is created
Finished running generic part of root.sh script.
Now product-specific root actions will be performed.
Finished product-specific root actions.
Adding entry to /etc/oratab file...
Finished execution of  /u01/app/oracle/Middleware/agent11g/root.sh ......
Then return to the Grid Control installation wizard and then click on Ok to continue.
20. The installation configuration assistants are now in progress. Please wait for this to complete.
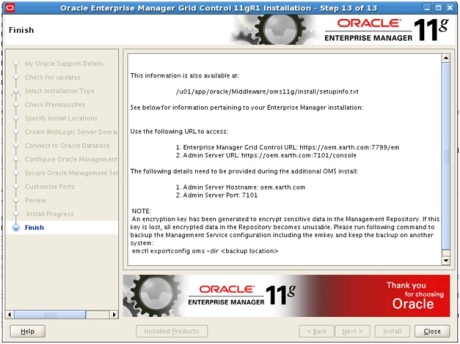
21. This now completes the installation. The following detail list how you can access the EM console and Adminstrator Console.
SECTION 6 – Post Installation Tasks
1. Add the following entries of the ORACLE_HOME for OMS and AGENT in the ORATAB file.
NOTE: On linux this is located under /etc/oratab
OMS:/u01/app/oracle/Middleware/oms11g:N
AGENT:/u01/app/oracle/Middleware/agent11g:N
2. Verify Web Tier is running:
oracle@oem[]$ . oraenv
ORACLE_SID = [] ? OMS
oracle@oem[OMS]$ export ORACLE_INSTANCE=/u01/app/oracle/gc_inst/WebTierIH1
oracle@oem[OMS]$ export PATH=$ORACLE_INSTANCE/bin:$PATH
oracle@oem[OMS]$ which opmnctl
/u01/app/oracle/gc_inst/WebTierIH1/bin/opmnctl
oracle@oem[OMS]$ opmnctl status -l
Processes in Instance: instance1
---------------------------------+--------------------+---------+----------+------------+----------+-----------+------
ias-component                    | process-type       |     pid | status   |        uid |  memused |    uptime | ports
---------------------------------+--------------------+---------+----------+------------+----------+-----------+------
ohs1                             | OHS                |   31912 | Alive    |   92828927 |   298032 |   0:42:33 | http:4889,https:4900,https:9999,https:7799,http:7788
3. Verify that OMS is running
oracle@oem[]$ . oraenv
ORACLE_SID = [] ? OMS
oracle@oem:[OMS]$ which emctl
/u01/app/oracle/Middleware/oms11g/bin/emctl
oracle@oem[OMS]$ emctl status oms
Oracle Enterprise Manager 11g Release 1 Grid Control
Copyright (c) 1996, 2010 Oracle Corporation.  All rights reserved.
WebTier is Up
Oracle Management Server is Up
3. Verify that Agent (OMA) is running
oracle@oem[]$ . oraenv
ORACLE_SID = [] ? AGENT
oracle@oem[AGENT] which emctl
/u01/app/oracle/Middleware/agent11g/bin/emctl
oracle@oem[AGENT] emctl status agent
Oracle Enterprise Manager 11g Release 1 Grid Control 11.1.0.1.0
Copyright (c) 1996, 2010 Oracle Corporation.  All rights reserved.
---------------------------------------------------------------
Agent Version     : 11.1.0.1.0
OMS Version       : 11.1.0.1.0
Protocol Version  : 11.1.0.0.0
Agent Home        : /u01/app/oracle/Middleware/agent11g
Agent binaries    : /u01/app/oracle/Middleware/agent11g
Agent Process ID  : 3462
Parent Process ID : 3439
Agent URL         : https://oem.earth.com:3872/emd/main/
Repository URL    : https://oem.earth.com:4900/em/upload
Started at        : 2010-10-21 20:51:47
Started by user   : oracle
Last Reload       : 2010-10-21 21:25:30
Last successful upload                       : 2010-10-21 21:32:08
Total Megabytes of XML files uploaded so far :    32.06
Number of XML files pending upload           :        0
Size of XML files pending upload(MB)         :     0.00
Available disk space on upload filesystem    :    66.86%
Last successful heartbeat to OMS             : 2010-10-21 21:31:12
---------------------------------------------------------------
Agent is Running and Ready
4. The EM and Weblogic Admin Console should now be accessible. For example:
| Description | URL | Super Administrator Accounts |
| EM Console | http://oem.earth.com:7788/em | sysman |
| Weblogic Admin Console | http://oem.earth.com:7101/console | weblogic |
NOTE: All hostname, IP addresses, URLs and ports mentioned above are used for demonstration purposes only.
SCAN Reconfiguration July 30, 2010
Posted by tamnau in 11g, General, RAC.Tags: 11g, Client, General, Grid Infrastructure, RAC, SCAN
11 comments
As you may know, SCAN (Single Client Access Name) is a new feature that has been introduced in 11.2 Oracle RAC. To put it simply, the SCAN is actually a single name alias which can be configured for clients to connect to the cluster database. In addition it will also handle the load balancing and failover for client connections. When the nodes in the cluster changes (eg. added or removed), the benefits of SCAN can be realised, as there is no requirement for the client to be reconfigured.
A good example on configuring SCAN for clients, Pas from Oracle has written an article which explains how this can be achieved. Just visit his blog entry Using SCAN – Single Client Access Name to Connect to 11g R2 RAC from JDeveloper 11g.
Configuring your clients to used SCAN in 11.2 or later is optional, however when you install the Grid Infrastructure software for RAC, the SCAN is still required to be configured for setup of the cluster.
It is recommended that the SCAN is resolvable to 3 IP addresses. However a minimum of 1 IP Address may be configured. It should also be registered in DNS for round robin resolution.
Reconfiguration of SCAN
There may be situations where reconfiguration of the SCAN for the cluster is required.
Some examples are:
- Allocation of IP addresses has changed for SCAN
- Adding additional IP addresses for SCAN
- DNS Changes associated with SCAN addressing
- SCAN name change^
NOTE: ^ SCAN name change may be required if there is conflicting name for another cluster on same network or in DNS, however this would mean that client reference to old SCAN is required be updated. Hence caution should be taken to ensure that SCAN name is unique in DNS and network.
In the below scenario, the following steps will show how SCAN addressing can be reconfigured for a cluster.
At the time of the installation, the DNS registration had not been setup. As a workaround, one of the IP addresses allocated for the SCAN was referenced in the /etc/hosts file. Once the installation was completed and DNS registration updated, the SCAN was then reconfigured to be resolvable through DNS for all 3 IP addresses.
Below is the summary of the current and new configuration for SCAN.
| Current | New | |
| SCAN Name | myscan | myscan |
| SCAN IP Address | 172.43.22.89 | 172.43.22.89 172.43.22.90 172.43.22.91 |
| SCAN entry in /etc/hosts file | Yes* | No |
| Registered in DNS and configured for round robin | No | Yes |
1. Verify Current Configuration for SCAN VIP
oracle@lnx01[GRID]:/app/oracle> srvctl config scan
SCAN name: myscan, Network: 1/172.43.22.0/255.255.255.0/bge0:nxge0
SCAN VIP name: scan1, IP: /myscan.earth.com/172.43.22.89
2. Verify Status for SCAN VIP
oracle@lnx01[GRID]:/app/oracle> srvctl status scan
SCAN VIP scan1 is enabled
SCAN VIP scan1 is running on node lnx02
3. Verify Current Configuration for SCAN Listener
oracle@lnx01[GRID]:/app/oracle> srvctl config scan_listener
SCAN Listener LISTENER_SCAN1 exists. Port: TCP:1521
4. Verify Status for SCAN Listener
oracle@lnx01[GRID]:/app/oracle> srvctl status scan_listener
SCAN Listener LISTENER_SCAN1 is enabled
SCAN listener LISTENER_SCAN1 is running on node lnx02
5. Stop the SCAN Listener
oracle@lnx01[GRID]:/app/oracle> srvctl stop scan_listener
6. Stop the SCAN VIPs
oracle@lnx01[GRID]:/app/oracle> srvctl stop scan
7. Verify Status for SCAN Listener has stopped
oracle@lnx01[GRID]:/app/oracle> srvctl status scan_listener
SCAN Listener LISTENER_SCAN1 is enabled
SCAN listener LISTENER_SCAN1 is not running
8. Verify Status for SCAN VIP has stopped
oracle@lnx01[GRID]:/app/oracle> srvctl status scan
SCAN VIP scan1 is enabled
SCAN VIP scan1 is not running
9. Update SCAN in DNS and associated IPs as required
10. Verify that resolv.conf is configured to search DNS domain that SCAN was registered for
oracle@lnx01[GRID]:/app/oracle> cat /etc/resolv.conf
search        earth.com
nameserver      172.43.7.1
nameserver      172.44.7.1
11. Verify that in DNS that that the SCAN is resolvable against all three IP Addresses
oracle@lnx01[GRID]:/app/oracle> nslookup myscan
Server:         172.43.7.1
Address:        172.43.7.1#53
Name:   myscan.earth.com
Address: 172.43.22.89
Name:   myscan.earth.com
Address: 172.43.22.90
Name:   myscan.earth.com
Address: 172.43.22.91
12. Verify that the scan IP and address name has been removed or commented out from the /etc/hosts file:
oracle@lnx01[GRID]:/app/oracle> grep myscan /etc/hosts
NOTE: In this example no rows are returned as IP and address name has been removed for scan
13. Modify the SCAN resource so that it update all SCAN VIPs resolvable by DNS
oracle@lnx01[GRID]:/app/oracle> sudo srvctl modify scan -n myscan
14. If the SCAN name was changed as well, run the following to update in Cluster Resource Control
oracle@lnx01[GRID]:/app/oracle> sudo crsctl modify type ora.scan_vip.type -attr "ATTRIBUTE=SCAN_NAME,DEFAULT_VALUE=myscan"
15. Verify that all SCAN VIPs are now resolvable and registered with the SCAN resource
oracle@lnx01[GRID]:/app/oracle> srvctl config scan
SCAN name: myscan, Network: 1/172.43.22.0/255.255.255.0/bge0:nxge0
SCAN VIP name: scan1, IP: /myscan.earth.com/172.43.22.90
SCAN VIP name: scan2, IP: /myscan.earth.com/172.43.22.91
SCAN VIP name: scan3, IP: /myscan.earth.com/172.43.22.89
16. Update the SCAN Listener with new SCAN VIPs identified from DNS
oracle@lnx01[GRID]:/app/oracle> srvctl modify scan_listener -u
17. Verify new SCAN Listeners registered for new SCAN VIPs
oracle@lnx01[GRID]:/app/oracle> srvctl config scan_listener
SCAN Listener LISTENER_SCAN1 exists. Port: TCP:1521
SCAN Listener LISTENER_SCAN2 exists. Port: TCP:1521
SCAN Listener LISTENER_SCAN3 exists. Port: TCP:1521
18. Start SCAN Listener
NOTE: This will also start the SCAN VIPs
oracle@lnx01[GRID]:/app/oracle> srvctl start scan_listener
19. Verify Status of all three SCAN VIPs have been enabled and are running.
oracle@lnx01[GRID]:/app/oracle> srvctl status scan
SCAN VIP scan1 is enabled
SCAN VIP scan1 is running on node lnx02
SCAN VIP scan2 is enabled
SCAN VIP scan2 is running on node lnx01
SCAN VIP scan3 is enabled
SCAN VIP scan3 is running on node lnx01
20. Verify Status of all three SCAN Listeners have been enabled and are running.
oracle@lnx01[GRID]:/app/oracle> srvctl status scan_listener
SCAN Listener LISTENER_SCAN1 is enabled
SCAN listener LISTENER_SCAN1 is running on node lnx02
SCAN Listener LISTENER_SCAN2 is enabled
SCAN listener LISTENER_SCAN2 is running on node lnx01
SCAN Listener LISTENER_SCAN3 is enabled
SCAN listener LISTENER_SCAN3 is running on node lnx01
Cloning a RAC Database May 20, 2010
Posted by tamnau in General, RAC, RMAN.Tags: ASM, Clone, Duplication, General, RAC, RMAN
7 comments
Cloning a RAC Database may appear somewhat challenging, but its actually cloning a database as if it was a single instance and then enabling it as a cluster post to the duplication.
In the below scenario, I will demonstrate how this can be achieved by cloning a RAC database and have it manage by the same cluster. Please note that the following was tested for version 11.1 RAC with ASM.
The RAC configuration used for this example:
NOTE*: Control file and online redo log copies, archived redo log files can be stored in the Flash Recovery Area (FRA) Disk Group.
1. Log onto source RAC database:
[oracle@lnx01] export ORACLE_SID=SALT1; . oraenv
[oracle@lnx01] sqlplus / as sysdba
SQL> create pfile='/app/oracle/scripts/clone/initPEPPER.ora';
2. Edit /tmp/initPEPPER.ora and change the appropriate values.
Remove the following entries:
<SOURCE_INSTANCE1>.__db_cache_size=7650410496
<SOURCE_INSTANCE2>.__db_cache_size=7583301632
<SOURCE_INSTANCE1>.__java_pool_size=67108864
<SOURCE_INSTANCE2>.__java_pool_size=67108864
<SOURCE_INSTANCE1>.__large_pool_size=67108864
<SOURCE_INSTANCE2>.__large_pool_size=67108864
<SOURCE_INSTANCE1>.__oracle_base='/app/oracle'
<SOURCE_INSTANCE2>.__oracle_base='/app/oracle'
<SOURCE_INSTANCE1>.__pga_aggregate_target=6643777536
<SOURCE_INSTANCE2>.__pga_aggregate_target=6643777536
<SOURCE_INSTANCE1>.__sga_target=9462349824
<SOURCE_INSTANCE2>.__sga_target=9462349824
<SOURCE_INSTANCE1>.__shared_io_pool_size=0
<SOURCE_INSTANCE2>.__shared_io_pool_size=0
<SOURCE_INSTANCE1>.__shared_pool_size=1409286144
<SOURCE_INSTANCE2>.__shared_pool_size=1476395008
<SOURCE_INSTANCE1>.__streams_pool_size=134217728
<SOURCE_INSTANCE2>.__streams_pool_size=134217728
3. Adjust Memory Target accordingly for your environment
*.memory_target=2G
4. Set spfile parameter:
*.spfile='+DG_DATA/PEPPER/spfilePEPPER.ora'
5. Disable the cluster_database parameter:
*.cluster_database=FALSE
6. Create init parameter under dbs:
[oracle@lnx01] export ORACLE_HOME=/app/oracle/product/11.1
[oracle@lnx01] cd $ORACLE_HOME/dbs
[oracle@lnx01] echo "SPFILE='+DG_DATA/PEPPER/spfilePEPPER.ora'" > $ORACLE_HOME/dbs/initPEPPER.ora
7. Edit initPEPPER.ora and add the following convert parameters:
*.log_file_name_convert=('+DG_DATA/SALT','+DG_DATA/PEPPER')
*.db_file_name_convert=('+DG_DATA/SALT','+DG_DATA/PEPPER')
8. Create the directories:
a) From one node only, create the ASM path for PEPPER database:
[oracle@lnx01] export ORACLE_SID=+ASM1; . oraenv
[oracle@lnx01] asmcmd mkdir +DG_DATA/PEPPER
[oracle@lnx01] asmcmd mkdir +DG_DATA/PEPPER/brsadata
b) From one node only, create the OS path for PEPPER admin directories:
[oracle@lnx01] mkdir -p /app/oracle/admin/PEPPER/adump
[oracle@lnx01] mkdir -p /app/oracle/diag/rdbms/PEPPER/PEPPER1/cdump
[oracle@lnx01] mkdir -p /app/oracle/diag/rdbms/PEPPER/PEPPER1/trace
c) Repeat step b on node 2 and other nodes in RAC:
[oracle@lnx02] mkdir -p /app/oracle/admin/PEPPER/adump
[oracle@lnx02] mkdir -p /app/oracle/diag/rdbms/PEPPER/PEPPER2/cdump
[oracle@lnx02] mkdir -p /app/oracle/diag/rdbms/PEPPER/PEPPER2/trace
9. Create a TNS entry for target auxiliary database and place in the tnsnames.ora. Add these entries on all nodes in cluster:
PEPPER =
 (DESCRIPTION =
 (ADDRESS = (PROTOCOL = TCP)(HOST = lnx01-vip)(PORT = 1521))
 (ADDRESS = (PROTOCOL = TCP)(HOST = lnx02-vip)(PORT = 1521))
 (CONNECT_DATA =
 (SERVICE_NAME = PEPPER)
 )
 )

LISTENERS_PEPPER =
 (ADDRESS_LIST =
 (ADDRESS = (PROTOCOL = TCP)(HOST = lnx01-vip)(PORT = 1521))
 (ADDRESS = (PROTOCOL = TCP)(HOST = lnx02-vip)(PORT = 1521))
 )

LISTENER_PEPPER1 =
 (ADDRESS = (PROTOCOL = TCP)(HOST = lnx01-vip)(PORT = 1521))

LISTENER_PEPPER2 =
 (ADDRESS = (PROTOCOL = TCP)(HOST = lnx02-vip)(PORT = 1521))
10. If no listener.ora exists, create one as follows
# Node 1
 LISTENER_lnx01 =
 (DESCRIPTION_LIST =
 (DESCRIPTION =
 (ADDRESS = (PROTOCOL = TCP)(HOST = lnx01-vip)(PORT = 1521)(IP = FIRST))
 (ADDRESS = (PROTOCOL = TCP)(HOST = 207.23.2.122)(PORT = 1521)(IP = FIRST))
 )
 )
# Node 2
 LISTENER_lnx02 =
 (DESCRIPTION_LIST =
 (DESCRIPTION =
 (ADDRESS = (PROTOCOL = TCP)(HOST = lnx02-vip)(PORT = 1521)(IP = FIRST))
 (ADDRESS = (PROTOCOL = TCP)(HOST = 207.23.2.126)(PORT = 1521)(IP = FIRST))
 )
 )
11. Create an SPFILE from the parameter file, and start the auxiliary instance:
[oracle@lnx01] export ORACLE_HOME=/app/oracle/product/11.1
[oracle@lnx01] export ORACLE_SID=PEPPER
SQL> CONNECT / as sysdba
SQL> CREATE SPFILE='+DG_DATA/PEPPER/spfilePEPPER.ora'
FROM PFILE='/app/oracle/scripts/clone/initPEPPER.ora';
SQL> STARTUP NOMOUNT;
12. Then run the following RMAN commands to duplicate the database:
[oracle@lnx01] rman target sysdba/<password>@SALT auxiliary /
RMAN> DUPLICATE TARGET DATABASE TO 'PEPPER';
14. Add the entry for oratab file (located under /etc or /var/opt/oracle) for target auxiliary db:
a) Add in For node 1 oratab file:
PEPPER1:/app/oracle/product/11.1:N
b) Add in For node 2 oratab file:
PEPPER2:/app/oracle/product/11.1:N
15. Enable the cluster parameter in the target auxiliary database from one node only
[oracle@lnx01] export ORACLE_HOME=/app/oracle/product/11.1
[oracle@lnx01] export ORACLE_SID=PEPPER
[oracle@lnx01] sqlplus / as sysdba
SQL> alter system set cluster_database=TRUE scope=spfile;
SQL> shutdown immediate;
16. Rename the init file and then copy the init file across to the
[oracle@lnx01] export ORACLE_SID=PEPPER1; . oraenv
[oracle@lnx01] mv $ORACLE_HOME/dbs/initPEPPER.ora $ORACLE_HOME/dbs/initPEPPER1.ora
[oracle@lnx01] scp $ORACLE_HOME/dbs/initPEPPER1.ora \
lnx02:/app/oracle/product/11.1/dbs/initPEPPER2.ora
17. Add the second thread of online redo logs and enable that thread;
SQL> startup
18. Start up the second instance:
SQL> ALTER DATABASE ADD LOGFILE THREAD 2 GROUP 5 '+DG_DATA' SIZE 250M reuse;
SQL> ALTER DATABASE ADD LOGFILE MEMBER '+DG_REDO' TO GROUP 5 ;
SQL> ALTER DATABASE ADD LOGFILE THREAD 2 GROUP 6  '+DG_REDO' SIZE 250M reuse;
SQL> ALTER DATABASE ADD LOGFILE MEMBER '+DG_DATA' TO GROUP 6;
SQL> ALTER DATABASE ADD LOGFILE THREAD 2 GROUP 7 '+DG_REDO' SIZE 250M reuse;
SQL> ALTER DATABASE ADD LOGFILE MEMBER '+DG_DATA' TO GROUP 7;
SQL> ALTER DATABASE ADD LOGFILE THREAD 2 GROUP 8 '+DG_REDO' SIZE 250M reuse;
SQL> ALTER DATABASE ADD LOGFILE MEMBER '+DG_DATA' TO GROUP 8;
SQL> ALTER DATABASE ENABLE PUBLIC THREAD 2;
19. Stop all instances on each node for the target auxiliary database
a) From node 1 perform the following:
[oracle@lnx01] export ORACLE_SID=PEPPER1; . oraenv
[oracle@lnx01] sqlplus / as sysdba
SQL> shutdown immediate;
b) Then perform for other instances in the cluster:
[oracle@lnx01] export ORACLE_SID=PEPPER2; . oraenv
[oracle@lnx01] sqlplus / as sysdba
SQL> shutdown immediate;
20. To add into the cluster, add the new database to srvctl:
[oracle@lnx01] srvctl add database -d PEPPER -o /app/oracle/product/11.1
[oracle@lnx01] srvctl modify database -d PEPPER -p '+DG_DATA/PEPPER/spfilePEPPER.ora' -s open
[oracle@lnx01] srvctl add instance -d PEPPER -i PEPPER1 -n lnx01
[oracle@lnx01] srvctl add instance -d PEPPER -i PEPPER2 -n lnx02
20. Start the RAC database
[oracle@lnx01] srvctl start database -d PEPPER
21. Now verify that the RAC database has now registered with the cluster.
For pre-11.2 run:
crs_stat –t
Or for 11.2 run:
crsctl stat res -t


